Description
Everybody, who had to do with big software projects, knows what it means to gain a survey about the project without any documentation.Doxygen is a popular open source tool, which can analyse and document software automatically.
For that purpose it uses special comments in the code, which describe methods, classes, variables or other program parts.
Furthermore Doxygen can visualize inheritances between classes and objects and dependances between methods.
This crash course describes the installation and configuration of Doxygen and the plugin Graphviz DOT, based on a Windows system.
This course doesn't discuss topics, like implementing own images or HTML syntax in Doxygen comments, in full length. But the Doxygen specific comment format will be explained in detail.
To document and to comment
Everyone, who writes programs, needs to comment his code.Typically you do this direct in the code.
Example: If you don't comment your code, you make it very difficult for other software engineers to understand your program. You even may have yourself difficulties to comprehend your own code after a time. Beside the commenting of the code, it is also often necessary to document the project.
A documentation is used for presentation, makes it easy for non-programmers to get familiar with the software and is something you can hand out once the project is finished.
Well, and this is the point where Doxygen is used.
So, let's have a look to installation and configuration of Doxygen...
Installation and configuration
First of all, we need to download Doxygen (5.4 MB).And we also download Graphviz DOT.
Graphviz DOT is a small plug-in for Doxygen, which allows graphical outputs, but later more about this... We should install Doxygen first, then Graphviz. Graphviz needs no configuration, but Doxygen does.
So, let's start Doxygen now:
Start → Programs → doxygen → doxywizard
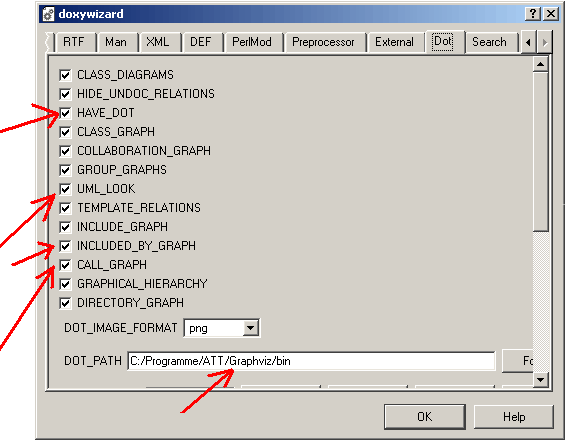
Click "Expert..." in the Doxygen Wizard and select the tab "Dot".
Here you need to tell Doxygen that Graphiz has been installed and the path to Graphviz.
Select "HAVE_DOT" and enter the path to the Graphiz binaries.
The settings should look like this:
Attention!
Don't use backslashes '\', but normal slashes '/' in the Graphiz path.
For instance: 'C:/' instead of 'C:\'
Don't use backslashes '\', but normal slashes '/' in the Graphiz path.
For instance: 'C:/' instead of 'C:\'
Now confirm by pressing "OK".
So, jetzt mit Klick auf "OK" die Einstellungen übernehmen.
Now back to the main window. Click "Wizard..." and you will be asked for a project name.
Enter the project name and give it a version number - for instance "Version 1.0".
Then specify the path to the code files at Source code directory.
This Folder should also used for Destination directory - Doxygen then creates a new subfolder "html", containing the generated documentation.
Now switch to the tab "Mode" and select the code language at "Select programming language to optimize the results for" (C, C++ or Java).
Select the tab "Output" and deactivate the LaTex option - excepting you also like to get a documentation in the LaTex format.
Last but not least we have a look at the tab "Diagrams" and verify if the setting look like this:

When everything looks fine, confirm with "OK" and once again we go back to the expert mode and select English from OUTPUT_LANGUAGE in the tab "Project".
That's all we had to set
Now you should save this settings in a Doxyfile, because you certainly don't like to repeat all this steps again next time.
Click "Save..." in the main window and store the Doxyfile in the project folder.
Finally there is one thing left, which Doxygen wants to know: in Working directory you must enter the path, from where Doxygen starts (this is the path to the Doxygen binaries) - I found out, that you can enter any valid path (for instance C:\) here as long as Doxygen has been added to the PATH list.
To check this just open a console window (Start->Execute->"cmd"), enter PATH and search the result for something like "C:\Program files\doxygen\bin".
Done!
By pressing "Start" Doxygen now generates the documentation in a subfolder "html" in your project folder.
This html folder then contains a "index.html".
And in the following we will have a more detailed look at this...
For demonstration, here is a exemplary Java project for download:
example project for Doxygen (300 KB)
And here the associated HTML documentation for direct view in your browser:
Doxygen example project - dokumentation
A few words about the example program:
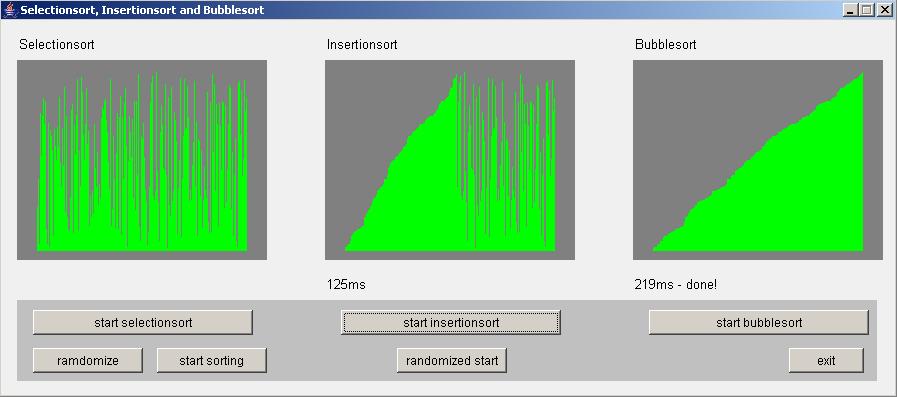
This is a Java program to sort arrays of integer with different sorting algorithms. The sorting prozess is shown graphically (screenshot).
It uses selectionsort, insertionsort and Bubblesort algortihms and compares execution times.
To run the program you need the Java Runtime Environment (JRE) from Sun Microsystems.
Doxygen comments
Well, but function and purpose don't matter now - let's have a look at the documentation.As already mentioned, Doxygen uses a special format of comments and if you look at the source code you'll find some comments, introduced with /** and closed with */
This is the typical syntax for Doxygen comments. The double asterisk is used by Doxygen to differ from common multi-line comments.
Furthermore all lines of comment should start with an asterisk.
There mustn't be any spaces or other characters, before this asterisks!
After the comment block follows the associated code segment.
This can be a function, variable, structure, ... But important is, to leave no blank line between comment block and code segment.
A typical Doxygen comment looks like this: Beside of this, there are some other forms of comment syntax allowed - you find here a survery: http://www.stack.nl/~dimitri/doxygen/docblocks.html
Keywords are identified with an @ or backslash \ to signify attributes of the code or to call special format options.
Let's have a look at the most common keywords:
@brief- a short code description@param abc- describes the parameter abc of an function@return- describes the return value of an function@class abc- describes the class abc@file abc.de- describes the file abc.de
A complete survey with all keywords can be found at http://www.stack.nl/~dimitri/doxygen/commands.html.
A comment example
Good, to illustrate this, we now go step-by-step through an easy example.First of all, we need a simple program to document: Now Dxoygen would be able to document this code - but only very rudimental.
Therefore we should give Doxygen a few more information about the main() function: The HTML result should then look like this: Not bad. Now we will add a description of the class: The text after @brief should describe the function and it purpose in a few words, while the more detailed briefing follows two lines below.
The generated documentation then looks like this: By clicking More ... you will be forwarded to the detailed description.
Well, now let us add some information about the file, containing this class: The keyword here is @file.
You may wonder, if this description makes sense, but if a project grows and contains many files you'll never want to miss this documentation function any more.
Last but not least a litte extra...
In priciple, all these steps are enough to generate a complete documentation - but one thing ist missing: the intro page!In the HTML documentation, the intro page is the index.html.
This looks still a little bit boring by now - there is nothing more than the title and the version number.
So let's add here a few more information about the project: The magic word here is @mainpage and is followed by an description of the project.
So far so good. But especially this intro page must look perfect - in Germany we say: the first impression is always the most formative!
So finally we will deal a little bit with HTML.
If you already know HTML, you may skip the following section...
HTML in Doxygen documentation
Note: the following keywords work only when the selected output format is HTML.With any other format, they will be ignored or may cause unwanted effects.
- Use
<br>to force a line break. - Use
<b>to initiate boldface and</b>to close it. - Use
<i>to initaiate italic type and</i>to close it. - Use
<ul>to initiate lists. The complete syntax is:* <ul>
* <li>first</li>
* <li>second</li>
* <li>third</li>
* </ul>
This causes following output:- first
- second
- third
- Use the
<img-keyword to add own pictures. Especially on the intro site, a screenshot of your program would be suitable. You do this with:* <img src="../images/application_screenshot.jpg" alt="Screenshot">
The "../images/" means, that the image is located in a subfoler "images" in you project folder.
Links and files
Doxygen websiteGraphviz website (DOT)
Example project (300 KB)
Doxygen 1.4.5 download (5.4 MB)
Graphviz download